New Project - Clairtone 7980

Status
Not open for further replies.

maxhifi

Member (SA)
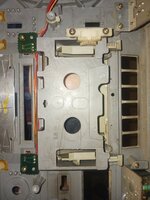
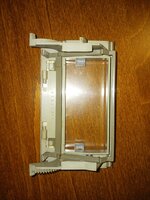
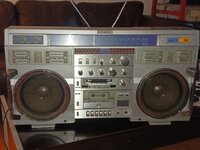
Recently obtained from original owner's son. Was used as a workshop radio. Very dirty but mostly complete. Missing one small knob, and the cassette storage drawer. The back side of the cabinet is cracked in a few places. Right channel works, left is dead. Left power IC replaced poorly at some time, pins not even trimmed, suspect it's bad.

I paid 280 CAD, and didn't bargain, because I was excited about the project! I've seen people pay way less online but I figure I could go another ten years and not see one locally at all, so I'm happy. Realized I had a membership here from ages go, so thought I'd log in and ask some questions!

Here goes:

How do the electrolytic capacitors in these fare over time, am I likely to find high esr and/or leaky caps, or do they age okay?

Any parts that are especially hard to find, or items that require more than a usual amount of attention?
 

floyd

Boomus Fidelis
Hi . I do know you can buy 3d printed cassette drawer and that small knob on eBay . sounds like that amp ic might be the problem if someone already messed with it.
 
  • Like
Reactions: maxhifi

maxhifi

Member (SA)
Yep. It's definitely the IC, there is zero voltage on the output pins, should be about 8 or 9 volts. The right one isn't perfect either, the two output pins aren't showing the same voltage. Through the "monitor" output, I get both channels. The tape decks try to run but the belts are obviously bad. In mono through only the right channel speakers, I'm really impressed with the volume and tone of this stereo.
 

maxhifi

Member (SA)
Congrats on a great project box! :popcorn:

Thank you! It is far from pristine but it's mostly all there. I've already got belts ordered and located a pair of output ICs locally. I've never heard such a large boom box in action, I feel fortunate to have found it!
 

Tinman

Member (SA)
How do the electrolytic capacitors in these fare over time, am I likely to find high esr and/or leaky caps, or do they age okay?
I have a 7979 and I believe the majority of those caps were Rubycon which always seem to fare well in all of the boxes I've had them in.
I've had Sanyo boxes with mostly Sanyo caps that seemed good too.
The only ones that I've had a problem with are Panasonic/Matsushita caps.
Many of the ones in my two 7700s, a 5250 and 5150 were leaky.
Oddly, when I've seen Panasonic caps in other brands of boxes, I've never noticed them to be leaking or cruddy.
 
  • Like
Reactions: maxhifi

maxhifi

Member (SA)
I have a 7979 and I believe the majority of those caps were Rubycon which always seem to fare well in all of the boxes I've had them in.
I've had Sanyo boxes with mostly Sanyo caps that seemed good too.
The only ones that I've had a problem with are Panasonic/Matsushita caps.
Many of the ones in my two 7700s, a 5250 and 5150 were leaky.
Oddly, when I've seen Panasonic caps in other brands of boxes, I've never noticed them to be leaking or cruddy.

Cool. May do some ESR testing before I order caps for it then. I work on lots of hifi gear but this is my first boom box. The one that confuses me is the speaker crossover cap being polarized. I've had it playing all day and I keep being surprised by how good the speakers are, the radio sounds great all over the main floor of my house, and that's in mono with only the right channel working.
 

maxhifi

Member (SA)
Tore it down tonight, WOW, this a big and more ambitious job than I thought it would be! Lots of respect for you guys who do this on a regular basis!

What's the deal with the cassette door, it has a slow open mechanism but I can't see a spring anywhere to actually open it when released. Could be missing in mine, or maybe I'm the one missing something.
 

caution

Member (SA)
You picked a fun one to start with! :yes: This is a favorite of mine. If you need a model for something, let me know as I probably drew it.
Here's the schematic (link) and a wiring diagram I drew (link)

There were at least three different types of springs used on the lower deck door - One went on the right hinge peg and the other two went on the back side of the door and poked through a hole on the chassis. Some had two legs and poked through two holes, but not all models have two holes. If you need their specs to make/source one, let me know.
 
Last edited:
  • Like
Reactions: Tinman and maxhifi

maxhifi

Member (SA)
You picked a fun one to start with! :yes: This is a favorite of mine. If you need a model for something, let me know as I probably drew it.
Here's the schematic (link) and a wiring diagram I drew (link)

There were at least three different types of springs used on the lower deck door - One went on the right hinge peg and the other two went on the back side of the door and poked through a hole on the chassis. Some had two legs and poked through two holes, but not all models have two holes. If you need their specs to make/source one, let me know.


It was actually your excellent wiring diagram that brought me to this site, I noticed your user name in the title block! It's nicely done, you obviously come from an engineering or technical drawing background. Thank you for preparing it, that's a time consuming and extremely useful job!

I will take a few photos of the chassis around the area where the spring could be, I think the specs could be quite useful. I will probably use the boombox mostly with cassettes, and mostly with deck one (since it has better specs), so it's important it works properly. Actually one stroke of luck with mine, is it was used only as a radio, so aside from being filthy the cassette mechanisms and heads have little to no wear.
 
  • Love
Reactions: caution

maxhifi

Member (SA)
Here's the photo of the back of the door - I can't really see where the spring is supposed to go.
 

Attachments

  • 20241018_090913.jpg
    20241018_090913.jpg
    134 KB · Views: 10
Last edited:

caution

Member (SA)
Oh, I meant on the back of the door, not the chassis

54075124777_0e6fd77850_o.jpg
 
  • Like
Reactions: maxhifi

maxhifi

Member (SA)
Oh, I meant on the back of the door, not the chassis

54075124777_0e6fd77850_o.jpg

Yes, that spring is what's missing. The door is seriously asking for a bath in my ultrasonic cleaner though, I've never had to work on such a filthy cassette player!
 

Attachments

  • 20241018_122631.jpg
    20241018_122631.jpg
    183.2 KB · Views: 8
Last edited:

maxhifi

Member (SA)
No bad capacitors so far, although two 0.5uf towa capacitors on the power amp board checked slightly high ESR, so I changed them just to be safe. I replaced both HA1392 ICs, and the tape decks are cleaned up and ready for belts. The original belts made a bit of a mess in deck 1. Cleaning the inside of the speaker grills revealed a massive amount of dust and other fifth, and badly faded cones. I did not remove the radio tuner, since to do so would mean taking the dial cord apart. Am excited to get this thing back together!
 

Tinman

Member (SA)
If the cones are black, go to an arts and crafts store and buy some black ink and dye them.
They'll look brand new and it's not like paint where you're adding a layer on to them.
The dye gets absorbed into the paper and doesn't add any weight.
When I began refurbing boxes, I used to color the cones with Sharpies but figured there had to be a better way and found the ink.
I've also dyed white cones that came out great.
Also, the dial cords aren't really that bad to restring.
Just take a lot of pics to refer back to.
 
  • Like
Reactions: maxhifi

maxhifi

Member (SA)
If the cones are black, go to an arts and crafts store and buy some black ink and dye them.
They'll look brand new and it's not like paint where you're adding a layer on to them.
The dye gets absorbed into the paper and doesn't add any weight.
When I began refurbing boxes, I used to color the cones with Sharpies but figured there had to be a better way and found the ink.
I've also dyed white cones that came out great.
Also, the dial cords aren't really that bad to restring.
Just take a lot of pics to refer back to.

I will do just that! I've got a turntable I use for rebuilding speakers, which should make the job all that much easier. I never thought about just using ink.

What about cassette motors? My usual strategy is a drop of oil on the top bearing and leave the rest alone, since my adventures taking cassette motors apart as a young person usually ended up in ruined brushes. I've seen people open them up on YouTube videos though.
 

Tinman

Member (SA)
I will do just that! I've got a turntable I use for rebuilding speakers, which should make the job all that much easier. I never thought about just using ink.

What about cassette motors? My usual strategy is a drop of oil on the top bearing and leave the rest alone, since my adventures taking cassette motors apart as a young person usually ended up in ruined brushes. I've seen people open them up on YouTube videos though.
That's basically what I do but others might have different opinions.
I usually wire the motor up to my DC power supply and turn it slowly with a drop of oil in the bearing.
Then I'll spin it up and run it a little bit.
When it comes to motors, I follow the old adage, "if it ain't broke, don't fix it".

Depending on what the ink consistency is, you can add a very small amount of water to thin it out.
I used the black ink on my National/Panasonic 5350 speakers with the ribs in them and they look amazing.
 
  • Like
Reactions: maxhifi

maxhifi

Member (SA)
Question: Regarding 3D printed parts, I have a few friends who own 3D printers. Are any of the files open source online? I wouldn't mind to call a few favors and ask my friends to make me a cassette tray, and a knob. I've been reading about how to make springs, need to get the cassette door spring sorted out, that bit seems possible.

Also, had anyone developed a method for refinishing the fake chrome bits? Mine had a previously life in an auto shop of some sort, and unfortunately some kind of solvent has compromised the chrome finish, and also the brushed aluminum parts. That stuff is lower priority though, I think I'd be happy with a worn down box that works properly and isn't missing any parts.
 
Last edited:
Status
Not open for further replies.