Printing new lettering around the controls

Status
Not open for further replies.

Reli

Boomus Fidelis
Those of you who have printed new lettering for a custom-painted box, can you share any tips? What kind of material did you print on? Do you remember the brand of the decal sheets you printed on? And have they ever fallen off or gotten bubbles under them?

Also, does the painted surface need to be glass-smooth for the lettering to stick good? Like, no metallic flake?
 

blu_fuz

Well-Known Member
Staff member
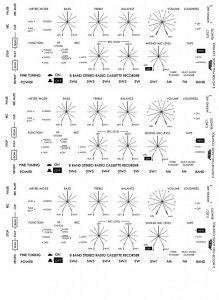
I got some samples from a vendor when I was painting the Redfire M90. You can order custom plates to be made for re-prints of the dry transfers. Company in Minnesota does it. You pay for the plate to be made and the amount of sheets you want printed. They keep the plate for future orders.


I was going to print silver transfers to put over the Redfire paint. I decided not to paint the center section of my Redfire M90 and left that gray.


IMG_4810.JPG
IMG_4811.JPG
IMG_4812.JPG
M90 proof for printing 3 sets.jpg
image.jpg
 

samovar

Member (SA)
Great thread, and extremely useful! Thanks Reli for thinking of it and even more thanks to blu_fuz for showing the real thing in action :-)
 

Reli

Boomus Fidelis
caution said:
Reli, I visited that shop in Minnesota, they made my dry transfers for the C100F.
But you must have created the digital file for them, right?
 

blu_fuz

Well-Known Member
Staff member
Just to clear things up, I never ordered the dry transfers BUT the samples they sent were awesome and the price they came up with was reasonable.

I created the CAD file but the original drawings from Glu needed a lot of tweeking to make them match 100% to the original M90 print.
 

Superduper

Moderator
Staff member
Original lettering was done using a silkscreening process. This is the best since it's actual paint and lasts as well as paint typically does.

But unless you plan to print hundreds of them, it's not practical from a restoration point of view. The dry transfers that I've used on my projects require burnishing. That means that they are pressure sensitive and you use a tool that looks like a tiny spoon to rub over the transfer and the pressure causes the lettering to stick. I would say minute surface texture makes the lettering stick better than smooth as glass. Also, you get 1 shot to do it right. If you lift and find that a chunk did not release because you didn't burnish it well enough, then it's probably not possible to "fix" it and make it look perfect like it would if it was burnished 100% before releasing the transfer sheet. That's not to say that you can't stop as soon as you notice the lettering lift and try burnishing again, but all I'm saying is better to be 100% sure that the transfers "took" before lifting the backing sheet. For best durability, you should paint the entire surface with clear to protect the newly labeled surface. If you do that, the lettering will have excellent wear characteristics. Some instructions suggest to paint the area with the lettering with a material applied like fingernail polish but if you do spot coating like that, the overall finish will never be even and the surface texture will be different. In my opinion, clear coat the entire area for best appearance.
 
Status
Not open for further replies.