That's great work . I would have never thought of just replacing the needles . pure genius.
Thanks Brother. I know Tinman performed this procedure on a Blockbuster a while back. I wanted to make sure these needles were compatible enough to swing with the music and they certainly do so I am happy.
The process was not documented so I had to adopted my own idea of what I thought needed to be done for the best success and the least modification. The photos make the process look like it was a remove and install but there was a lot of dremel tool cutting to get these to fit in the housing. The new motor coils power legs are on the bottom versus top and the entire coil body was about 3mm wider than the originals so the sidewalls of the housing had to be carefully ground away to allow clearance. The bottom had to be opened up for the power input board. Then the power legs had to be twisted vertical so they would align with the slots in the driver board of the Blockbuster.
Here I will share the cuts I had to make and the differences of the coils with a few photos I took.
While it's not original, I am actually kind of relieved because the currently unstuck stock meters don't seem to stay unstuck and the repaired ones don't stay repaired. The working old stock meters, repaired or not, are probably a few swings away from sticking with any degree of regular use. At least now I have a new set of meters that, while do not swing exactly like the originals, will likely go my lifetime without dying. That is important to me because I abuse this radio with use every day.
So here are a few extra shots of what I did to the housing and the difference in the meter coils. Good thing about this is, the housing is not modified to the point to where good stock meters can't go back in if I die and someone wanted to restore it with working stock parts they might have. I could get this back to original if I ever find another meter that has one dead needle. I am keeping my one good needle just for this reason.
Anyway on to the photos. Here you can see I cut a slit at the bottom. I did not take a picture of me making clearance of the inside edges.

There are tiny tabs on the bottom of the front cover that needed to be removed for clearance of the replacement motor coils as they have a metal mounting bar on the front that the originals didn't have. Easy enough. A pair of pliers and a twist and off they came. They really don't to anything from what I can see anyway to the original coils.

Here are the two different coils facing each other to show differences.

So how did I get them out without damaging them? Well, the first thing you have to do is use acetone to dissolve the glue securing the power input leads on the back. Once you can wiggle them to know they are free, that is sufficient. Just make sure as you start removing the motor coil from the front that the power leads are being pushed through at the same rate or you will crack the rear power board off in the back. Also, avoid touching anything other than the housing of the coil. The needle and spring on the front and rear are the most easily damaged while exposed.
Hopefully this might help someone keep their needles moving. There are other new VU meters I have seen with white needles if you are wanting more of a stock look. I went with these because I am not concerned with collectors knowing its not original. I selected these because I knew from Tinman that they would at least swing. If you get a meter that is too off in value, it won't move at all and how discouraging would that be. Too much work to not know so I appreciate his past post showing what meter assembly he purchased.
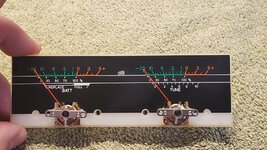
Some boomboxes have trimmers on the main board to adjust meter level. I am not sure if the Blockbuster does but these swing at least half way and I can still use the right meter for tuning strength. The left meter will not display battery power correctly in accordance to the level imprinted on the VU card backing so I will have to make a mental note of where the needle sits with fully charged batteries. Currently that is around the 70% mark. I will look at it again when the batteries need charged according to my multimeter and see where it sits then. Once I have that down, I will be in good shape
")
If I wanted to restore the factory operation of the needles, I believe I could accomplish this with a 12V DC powered VU driver board in between the radio and the non factory meter coils. That would allow me to adjust them to the proper levels. I might do that one day. Those boards aren't but 12 bucks or so and the box runs off of 12V so it would be easy to wire into the power switch, etc..


 I love this little box
