DJ Tech DJ Boombox
- Thread starter BoomboxLover48
- Start date
You are using an out of date browser. It may not display this or other websites correctly.
You should upgrade or use an alternative browser.
You should upgrade or use an alternative browser.
- Status
- Not open for further replies.
trippy1313
Member (SA)
trippy1313
Member (SA)
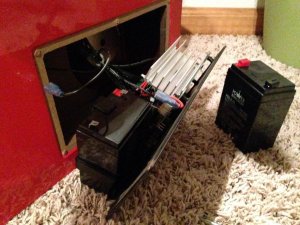
How's the weigh comparison, with the new battery?blu_fuz said:
mellymelsr
Member (SA)
trippy1313
Member (SA)
That's it? That battery looks twice the size of the original! One pound is nothing for that big of an upgrade.mellymelsr said:The bigger battery adds a little over 1 pound.
I searched and searched to find one for a member here. Somehow this early piece was the display/demo that everyone has had their fingers on. It has a few scratches and bumps, rubber handle bushings missing, dead battery, pre-production box, no manual, but does have the OG power supply.
No matter the price, I had to get it in a collectors hands. Lucky for us the seller didn't want an arm and a leg!
https://www.youtube.com/watch?v=ewQWVSXDOgA
No matter the price, I had to get it in a collectors hands. Lucky for us the seller didn't want an arm and a leg!
https://www.youtube.com/watch?v=ewQWVSXDOgA
Transistorized
Member (SA)
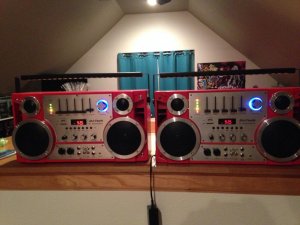
Really love my DJT box. The best feature for me is recording off the radio in STEREO!!!! Hallelujah. I haven't been able to do that since cassette. Not many (if any) new devices let your record off of the radio anymore.
Kind of a lost art these days. Glad I snagged mine when they got started. These things are already Rare birds with more demand than stock
Kind of a lost art these days. Glad I snagged mine when they got started. These things are already Rare birds with more demand than stock

caution
Member (SA)
Finally got some time to spend on attaching feet. Initially I picked out some screws and was about to drill some pilot holes, and backed out of that. Didn't want to disturb the bottom in case I changed my mind later, so I went with a strong tape. But that would require the insides to be filled with something so there is a surface. I started by grinding down the middle piece, which was a bit too high and had four little nubs sticking out of it. Then I drilled some holes in the support fins to allow the material I add to stay put.
I found some quick set putty that's sandable in 60 minutes. It set so fast I had to buy a third tube of it because the last chunk got too hard after only 4-5 minutes. I was just a little short on two feet so I had to rough them up a bit and fill it out with a little more before sanding. Hard as a rock though, worked great! Then I cut the Gorilla tape using the cutting machine, using sticker backing paper destined for the trash.
I first chose rubber cement to glue the Gorilla tape to the feet, but thought I might do better with some silicone. Bzzzt wrong answer! The tape peeled off the foot before the backing would budge. So I went with some E6000, that worked. I roughed up the tape surface a bit too, so that probably helped.
Kept them under a little pressure to set (the tape edges were coming up) and stuckem' down! I got the front two a little off so I had a chance to find out how well they stick by taking them back off for a re-center. They're not going anywhere
One silver lining: I initially figured I'd place the front ones farther forward, but didn't think that doing so would make removal of the front panel impossible without taking the feet off first. But, the way the tape didn't quite fill the bottom, I used that little slice that didn't get covered with tape to stick out past the ridge, since it had no glue and had enough clearance to get over the start of the front panel. Just enough that there's still enough of the foot taped down.


I found some quick set putty that's sandable in 60 minutes. It set so fast I had to buy a third tube of it because the last chunk got too hard after only 4-5 minutes. I was just a little short on two feet so I had to rough them up a bit and fill it out with a little more before sanding. Hard as a rock though, worked great! Then I cut the Gorilla tape using the cutting machine, using sticker backing paper destined for the trash.
I first chose rubber cement to glue the Gorilla tape to the feet, but thought I might do better with some silicone. Bzzzt wrong answer! The tape peeled off the foot before the backing would budge. So I went with some E6000, that worked. I roughed up the tape surface a bit too, so that probably helped.
Kept them under a little pressure to set (the tape edges were coming up) and stuckem' down! I got the front two a little off so I had a chance to find out how well they stick by taking them back off for a re-center. They're not going anywhere

One silver lining: I initially figured I'd place the front ones farther forward, but didn't think that doing so would make removal of the front panel impossible without taking the feet off first. But, the way the tape didn't quite fill the bottom, I used that little slice that didn't get covered with tape to stick out past the ridge, since it had no glue and had enough clearance to get over the start of the front panel. Just enough that there's still enough of the foot taped down.


SLO
Member (SA)
Haha, thats all I used, Eric went above and beyond but I gotta admit, it looks pimpReli said:Damn
At first I was going, why didn't he just use the feet that came with it? Then I saw the last pic and saw the gold....Damn that looks nice!!
JustCruisin
Member (SA)
caution
Member (SA)
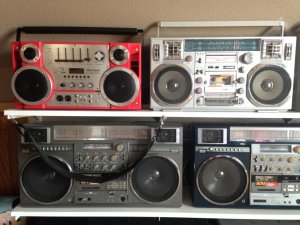
Thanks guys! Haha JC  Yeah there is exactly zero clearance. Shelf is still resting on the pegs, barely, if you can believe it. Sooooo close!
Funny thing, most of my boxes fit nearly perfectly into the sizes available
The bottom shelf is coming down a notch, but first I gotta make the hole for the wall outlet larger, so the power strip can use the lower socket.
 Yeah there is exactly zero clearance. Shelf is still resting on the pegs, barely, if you can believe it. Sooooo close!
Funny thing, most of my boxes fit nearly perfectly into the sizes available
The bottom shelf is coming down a notch, but first I gotta make the hole for the wall outlet larger, so the power strip can use the lower socket.
- Status
- Not open for further replies.


