Clairtone 7980 - Tape 1 Mech Question

caution

Member (SA)
Actually there are three types of eject springs - two that go behind the door, and one that goes on the right hinge.

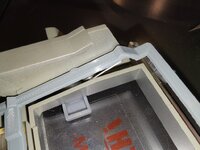
Some units have a double torsion spring behind the door, like this:

55096038043_0987c7d7cc_b.jpg

54075124777_0ed6f54d3a_b.jpg


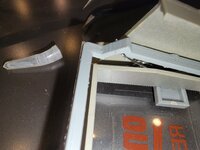
However, many units didn't have the second hole drilled out, although you can see where it *should* have been:

55096246795_253186b30a_b.jpg

55096141929_163dc4eb6f_b.jpg


The third version that goes on the right hinge is the one that came on my units. You can see the specs for it here:
Can anyone confirm what the Original Tape 1 door spring looks like on a Conion C-100F

I'm not sure why they made this version because the door is designed to have it on the back.
Since they didn't provision room for the side one, the spring pushes the door slightly to the left.

I never owned either of the versions that go on the back of the door, so I don't have specs for those.

If you're feeling adventurous you might try crafting the original double torsion spring, so you get even force across the door (although you might have to drill out the second hole) and avoid a door that doesn't look centered.
 

caution

Member (SA)
@caution . Any recommendations for printing and supports?
Forgot to mention - I've never owned a printer, I always had them done by someone else. They used an HP Jet Fusion printer, which if you're familiar with those, use a bed of nylon powder where a laser sinters the powder together, so as it works, the unsintered powder acts as a defacto support structure. I'm assuming you're using a conventional x-y printer, so your software should have the ability to add in support structures.
 

Endervox

Member (SA)
Ok so the piece print and installation went remarkably well. The springs also fit perfect. Now I need to figure out these other springs for the door.

I printed in conventional PLA. It's a bit flexible so we'll see if I need to have a friend print in PVC.
 

Attachments

  • 20260214_182318.jpg
    20260214_182318.jpg
    157.4 KB · Views: 2
  • 20260214_182326.jpg
    20260214_182326.jpg
    165.7 KB · Views: 2
  • Like
Reactions: caution

Endervox

Member (SA)
For the hole, are you suggesting one end of the double spring goes through? I'm confused by what springs are what. I can see the springs on either side of the door hinge, like on yours, mine doesn't have that. Would that suggest mine uses the double ended spring?

Who knew this would be so complicated.
 

caution

Member (SA)
If you look at the first of two images showing the front of the chassis with the door off, you'll see a pair of divots:

55096034751_d9020fc95e_b.jpg


The left one in this image does not go all the way through. You can see this in the image below that, which shows the back side of this area.

What I was suggesting is that if your unit doesn't have this one drilled out, you'll have to do that yourself, if in fact you want to make/use the double-torsion spring shown on the back of the door, in the first pair of images on that post:

Alternatively, you could simply make a single torsion spring for the hole which is already there (the right hole).

I'd recommend doing one of those two styles honestly, since it will be more in line with the original intent of the design, rather than make the one that I have, i.e. the spring that slips onto the right hinge of the door.

To be clear, this "hinge spring" only goes on the right side; there isn't enough of a gap between the door and the chassis to put a spring on both hinges. I've noticed that having the eject spring so far to one side tends to make the door sit a bit unevenly when closed, with the right side pushing out slightly more than the left side. Having the spring behind the door, even if it's just a single spring going through the right hole in the chassis, puts the outward pressure closer to the center of the door and makes it look more flat when closed.
 
Last edited:

Endervox

Member (SA)
Alright so I made a double ended spring, and made it work! Not perfect, but good enough. I've reassembled everything. The glue is drying on the cassette door decorative face that came loose during tinkering. It works...

That said, the audio quality is.... Not great. During playback the tape sounds like it's occasionally dragging. I adjusted to 3khz as much as possible with some tape drag.

Thoughts on what causes this? Deck 2 doesn't have the same issue.
 

caution

Member (SA)
The belt that connects the right spindle to the pulley that moves the LEDs on the tape run display tends to introduce a lot of drag. You might try removing that belt and see if it improves.

I had this problem too. You can see how I solved it in post #7 on this thread (link). I taped a washer to the back of the gearbox where the opposite end of the shaft protrudes. The washer's hole is slightly larger than the shaft, and keeps it straight, preventing it from rubbing against whatever's inside of that thing, and instead rubs against the inside edge of the washer's hole, which isn't enough to cause drag issues.
 

Endervox

Member (SA)
Interesting... Now that you mention it, the tape visualization run display doesn't turn well or consistently; I think you're right that it's the issue.

I'm done for the night, I'll take a look tomorrow morning.

Your help is very much appreciated.