Hi Guys,
As mentioned in my recent thread regarding a newly acquired RX-DT680, this morning I've just completed the line-in mod that has now allowed this Panny to become my 'go to' indoor boombox.
I've done the same mod before on my original DT680 and as before, it was a pretty straight forward process.
This mod is suitable for connecting mobile phones/MP3 players. The tape circuit this mod connects to has a higher sensitivity than standard line level line inputs so is not suitable for input sources that do not allow adjustment of the input levels e.g external CD players etc.
This time around, I'm providing a more detailed description of what's involved for anyone out there contemplating the same mod:
1. Remove all the rear screws including the two inside the main battery compartment + the small front screw located behind the volume knob. Open both deck doors and then open the CD cover. Lift up the little tab located at the front of the CD opening and remove the front cover.
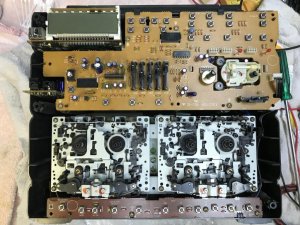
2. Remove the 3 screws retaining the bottom button switch 'stick assembly' and push aside.
3. Remove the 6 screws retaining the deck assembly. Lift up the deck assembly just enough to allow you to disconnect the two multi pin connectors. The deck assembly can now be removed. One of the multi pin connectors is slightly longer than the other so they can only be reconnected the right way.
4. Turn the unit around and locate the yellow sticker on the rear. This will be the location of your new RCA inputs.
5. Drill two holes in the approximate left to right center of the yellow sticker. Start out drilling small pilot holes first and then go to a stepped style of drill bit to avoid cracking the rear casing.
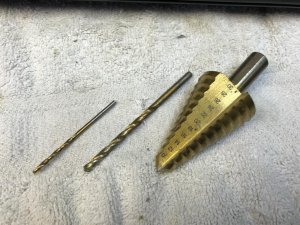
I then used a round file to enlarge the holes to the exact size required.
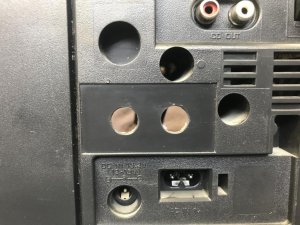
6. I used an RCA input panel from Jaycar Electronics. https://www.jaycar.com.au/2-way-phenolic-rca-socket/p/PS0263
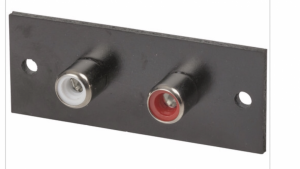
I had to trim around 6mm from each side to allow it to fit in the space allowed.
7. Bridge the ground terminals of both channels of the RCA inputs with wire/solder.
8. Cut 3 pieces of suitable gauge wire to around 10 inches in length each and then solder these wires to the Left and Right channel terminals of the RCA inputs. Next solder a third wire to create the earth.
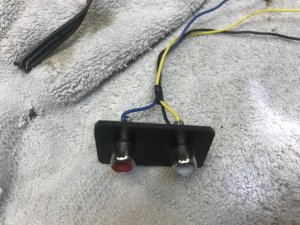
9. Place a little super glue on the RCA input panel before inserting them, together with the 3 attached wires from the front into the holes you've drilled in the rear case.
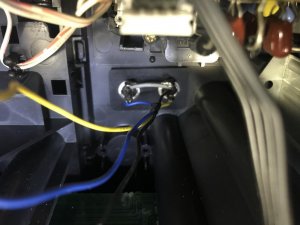
Then JB Weld around the RCA panel to ensure a solid joint.
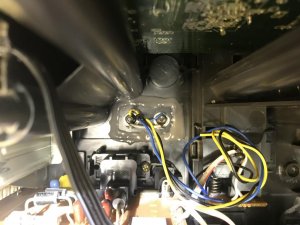
As you can see, with the decks out of the way, there is plenty of room allowing for easy access. The main board does not have to be removed during the mod.
10. Tin the ends of the 3 wires. Locate the 3 solder pads on the underside of the main board. (W301). The pads are very close together so you will need a fine tip soldering iron to make things easier. With pre-tinned wire tips, you should be able to simply hold the wire against the factory solder blob and apply heat for a clean solder joint.
a: The left most pad is your GROUND. (Black wire).
b: The next pad to the right is your RIGHT channel. (Blue wire)
c: The next one to the right is your LEFT channel. (Yellow wire)
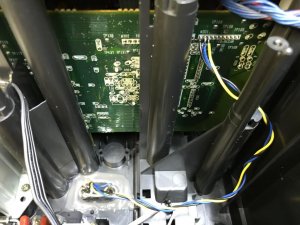
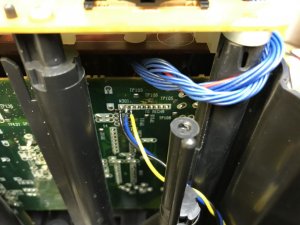
11. Ensure you have not bridged the connections whilst soldering. Test for continuity with a multi-meter. If the left and right channel solder pads are accidentally bridged, the 680 line in mod will only operate in mono!
12. Re-assemble in the reverse order.
13. Fire the Panny back up and select 'Tape' mode. Hook up your Iphone/MP3 player and you're away. The sensitivity of the tape circuit is ideal. I normally have the volume of my Iphone set to 1/2 to 2/3 volume for a volume similar to that offered by the CD player in this unit at a given volume setting. I've noticed no RF interference and no hiss at all whilst using the new Line In.
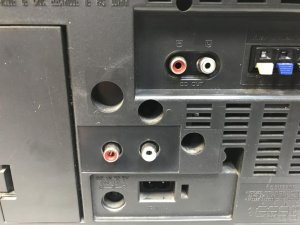
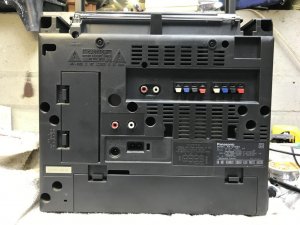

The function of the tape decks is completely unaffected by this mod. However, you will have to disconnect the RCA line in cables when playing a tape as leaving them connected will reduce the output level to the speakers.
Total time to complete the mod was around 1.5 hours. Centering, drilling and filing the holes for the RCA inputs is probably the most time consuming part of this mod.
Have fun and good luck with your own mod project.
James....
As mentioned in my recent thread regarding a newly acquired RX-DT680, this morning I've just completed the line-in mod that has now allowed this Panny to become my 'go to' indoor boombox.
I've done the same mod before on my original DT680 and as before, it was a pretty straight forward process.
This mod is suitable for connecting mobile phones/MP3 players. The tape circuit this mod connects to has a higher sensitivity than standard line level line inputs so is not suitable for input sources that do not allow adjustment of the input levels e.g external CD players etc.
This time around, I'm providing a more detailed description of what's involved for anyone out there contemplating the same mod:
1. Remove all the rear screws including the two inside the main battery compartment + the small front screw located behind the volume knob. Open both deck doors and then open the CD cover. Lift up the little tab located at the front of the CD opening and remove the front cover.

2. Remove the 3 screws retaining the bottom button switch 'stick assembly' and push aside.
3. Remove the 6 screws retaining the deck assembly. Lift up the deck assembly just enough to allow you to disconnect the two multi pin connectors. The deck assembly can now be removed. One of the multi pin connectors is slightly longer than the other so they can only be reconnected the right way.

4. Turn the unit around and locate the yellow sticker on the rear. This will be the location of your new RCA inputs.
5. Drill two holes in the approximate left to right center of the yellow sticker. Start out drilling small pilot holes first and then go to a stepped style of drill bit to avoid cracking the rear casing.

I then used a round file to enlarge the holes to the exact size required.

6. I used an RCA input panel from Jaycar Electronics. https://www.jaycar.com.au/2-way-phenolic-rca-socket/p/PS0263

I had to trim around 6mm from each side to allow it to fit in the space allowed.
7. Bridge the ground terminals of both channels of the RCA inputs with wire/solder.
8. Cut 3 pieces of suitable gauge wire to around 10 inches in length each and then solder these wires to the Left and Right channel terminals of the RCA inputs. Next solder a third wire to create the earth.

9. Place a little super glue on the RCA input panel before inserting them, together with the 3 attached wires from the front into the holes you've drilled in the rear case.

Then JB Weld around the RCA panel to ensure a solid joint.

As you can see, with the decks out of the way, there is plenty of room allowing for easy access. The main board does not have to be removed during the mod.
10. Tin the ends of the 3 wires. Locate the 3 solder pads on the underside of the main board. (W301). The pads are very close together so you will need a fine tip soldering iron to make things easier. With pre-tinned wire tips, you should be able to simply hold the wire against the factory solder blob and apply heat for a clean solder joint.
a: The left most pad is your GROUND. (Black wire).
b: The next pad to the right is your RIGHT channel. (Blue wire)
c: The next one to the right is your LEFT channel. (Yellow wire)


11. Ensure you have not bridged the connections whilst soldering. Test for continuity with a multi-meter. If the left and right channel solder pads are accidentally bridged, the 680 line in mod will only operate in mono!
12. Re-assemble in the reverse order.
13. Fire the Panny back up and select 'Tape' mode. Hook up your Iphone/MP3 player and you're away. The sensitivity of the tape circuit is ideal. I normally have the volume of my Iphone set to 1/2 to 2/3 volume for a volume similar to that offered by the CD player in this unit at a given volume setting. I've noticed no RF interference and no hiss at all whilst using the new Line In.


The function of the tape decks is completely unaffected by this mod. However, you will have to disconnect the RCA line in cables when playing a tape as leaving them connected will reduce the output level to the speakers.
Total time to complete the mod was around 1.5 hours. Centering, drilling and filing the holes for the RCA inputs is probably the most time consuming part of this mod.
Have fun and good luck with your own mod project.
James....


 I'll have to do it the next time I'm in FL.


