Conion C100 resto
- Thread starter caution
- Start date
You are using an out of date browser. It may not display this or other websites correctly.
You should upgrade or use an alternative browser.
You should upgrade or use an alternative browser.
baddboybill
Boomus Fidelis
You have got patience like no other. That unit is gonna purr like new. Very cool 😎😎
Bad Boy Bill
Bad Boy Bill
Lasonic TRC-920
Moderator
Lasonic TRC-920
Moderator
Yep, just went through the whole thing again. DAMN what a job!-GZ- said:Just read this thread again from the beginning. You are a mad man. Plain and simple.
Simply amazing work
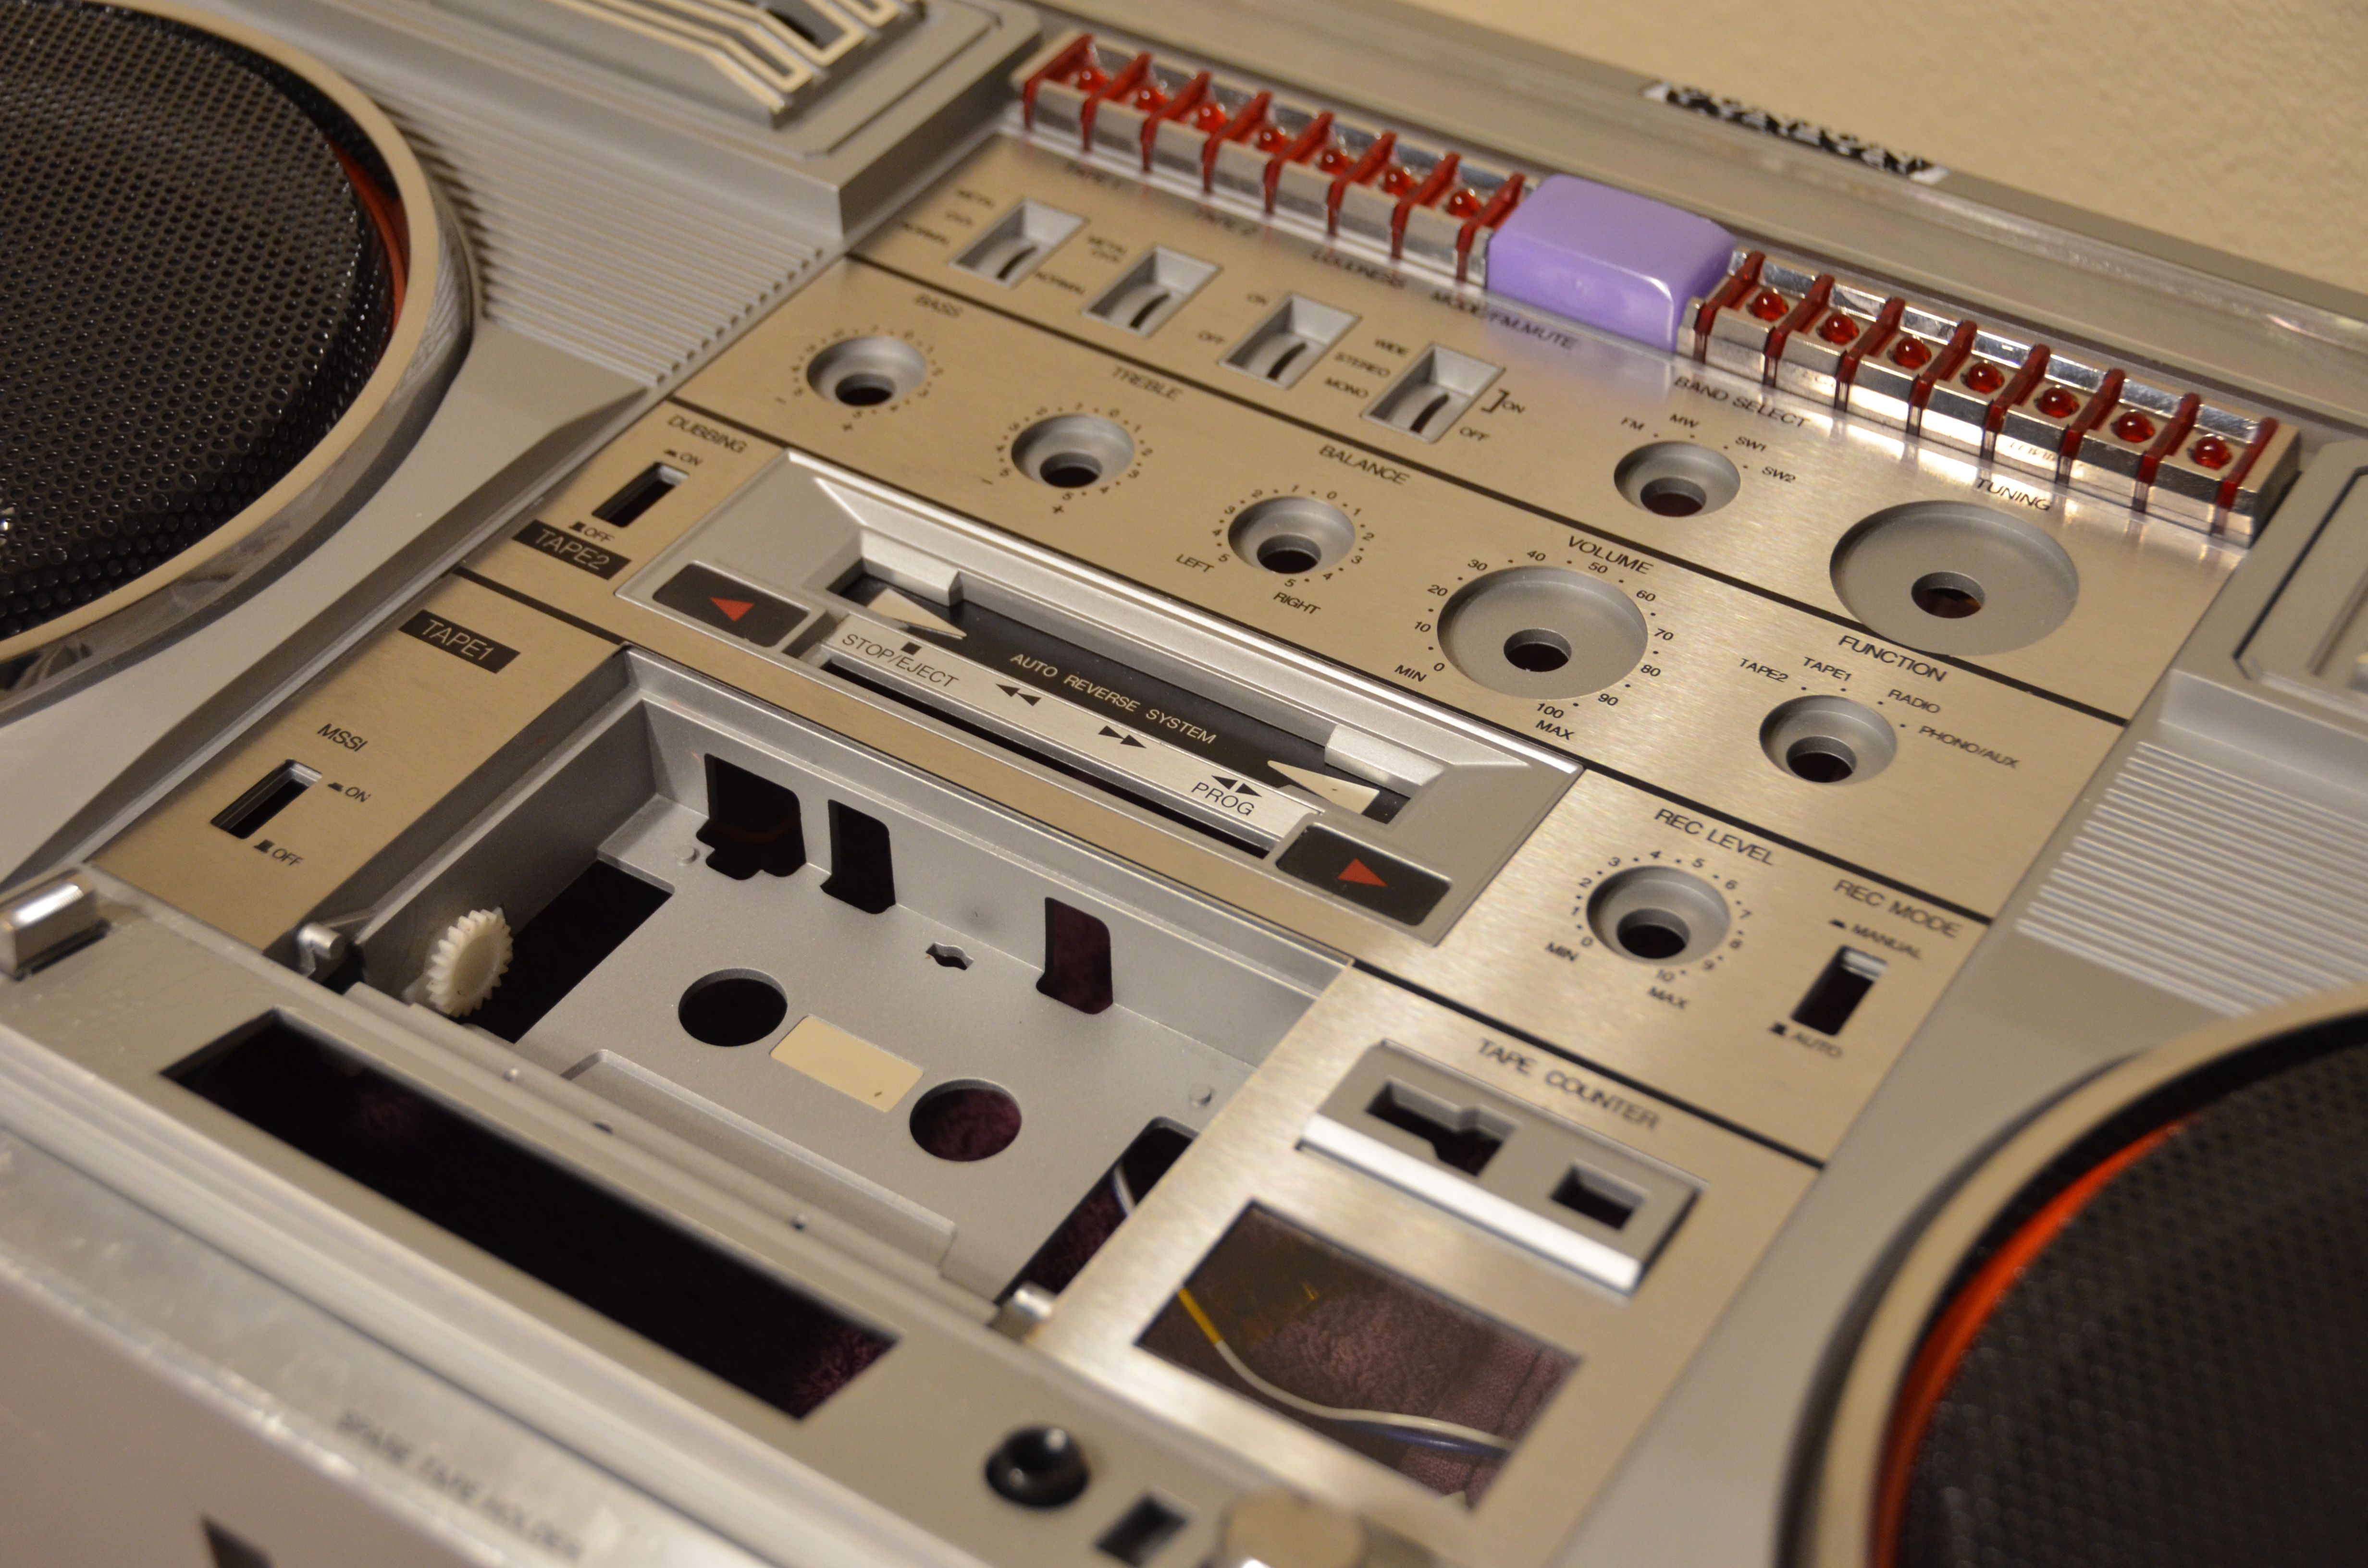
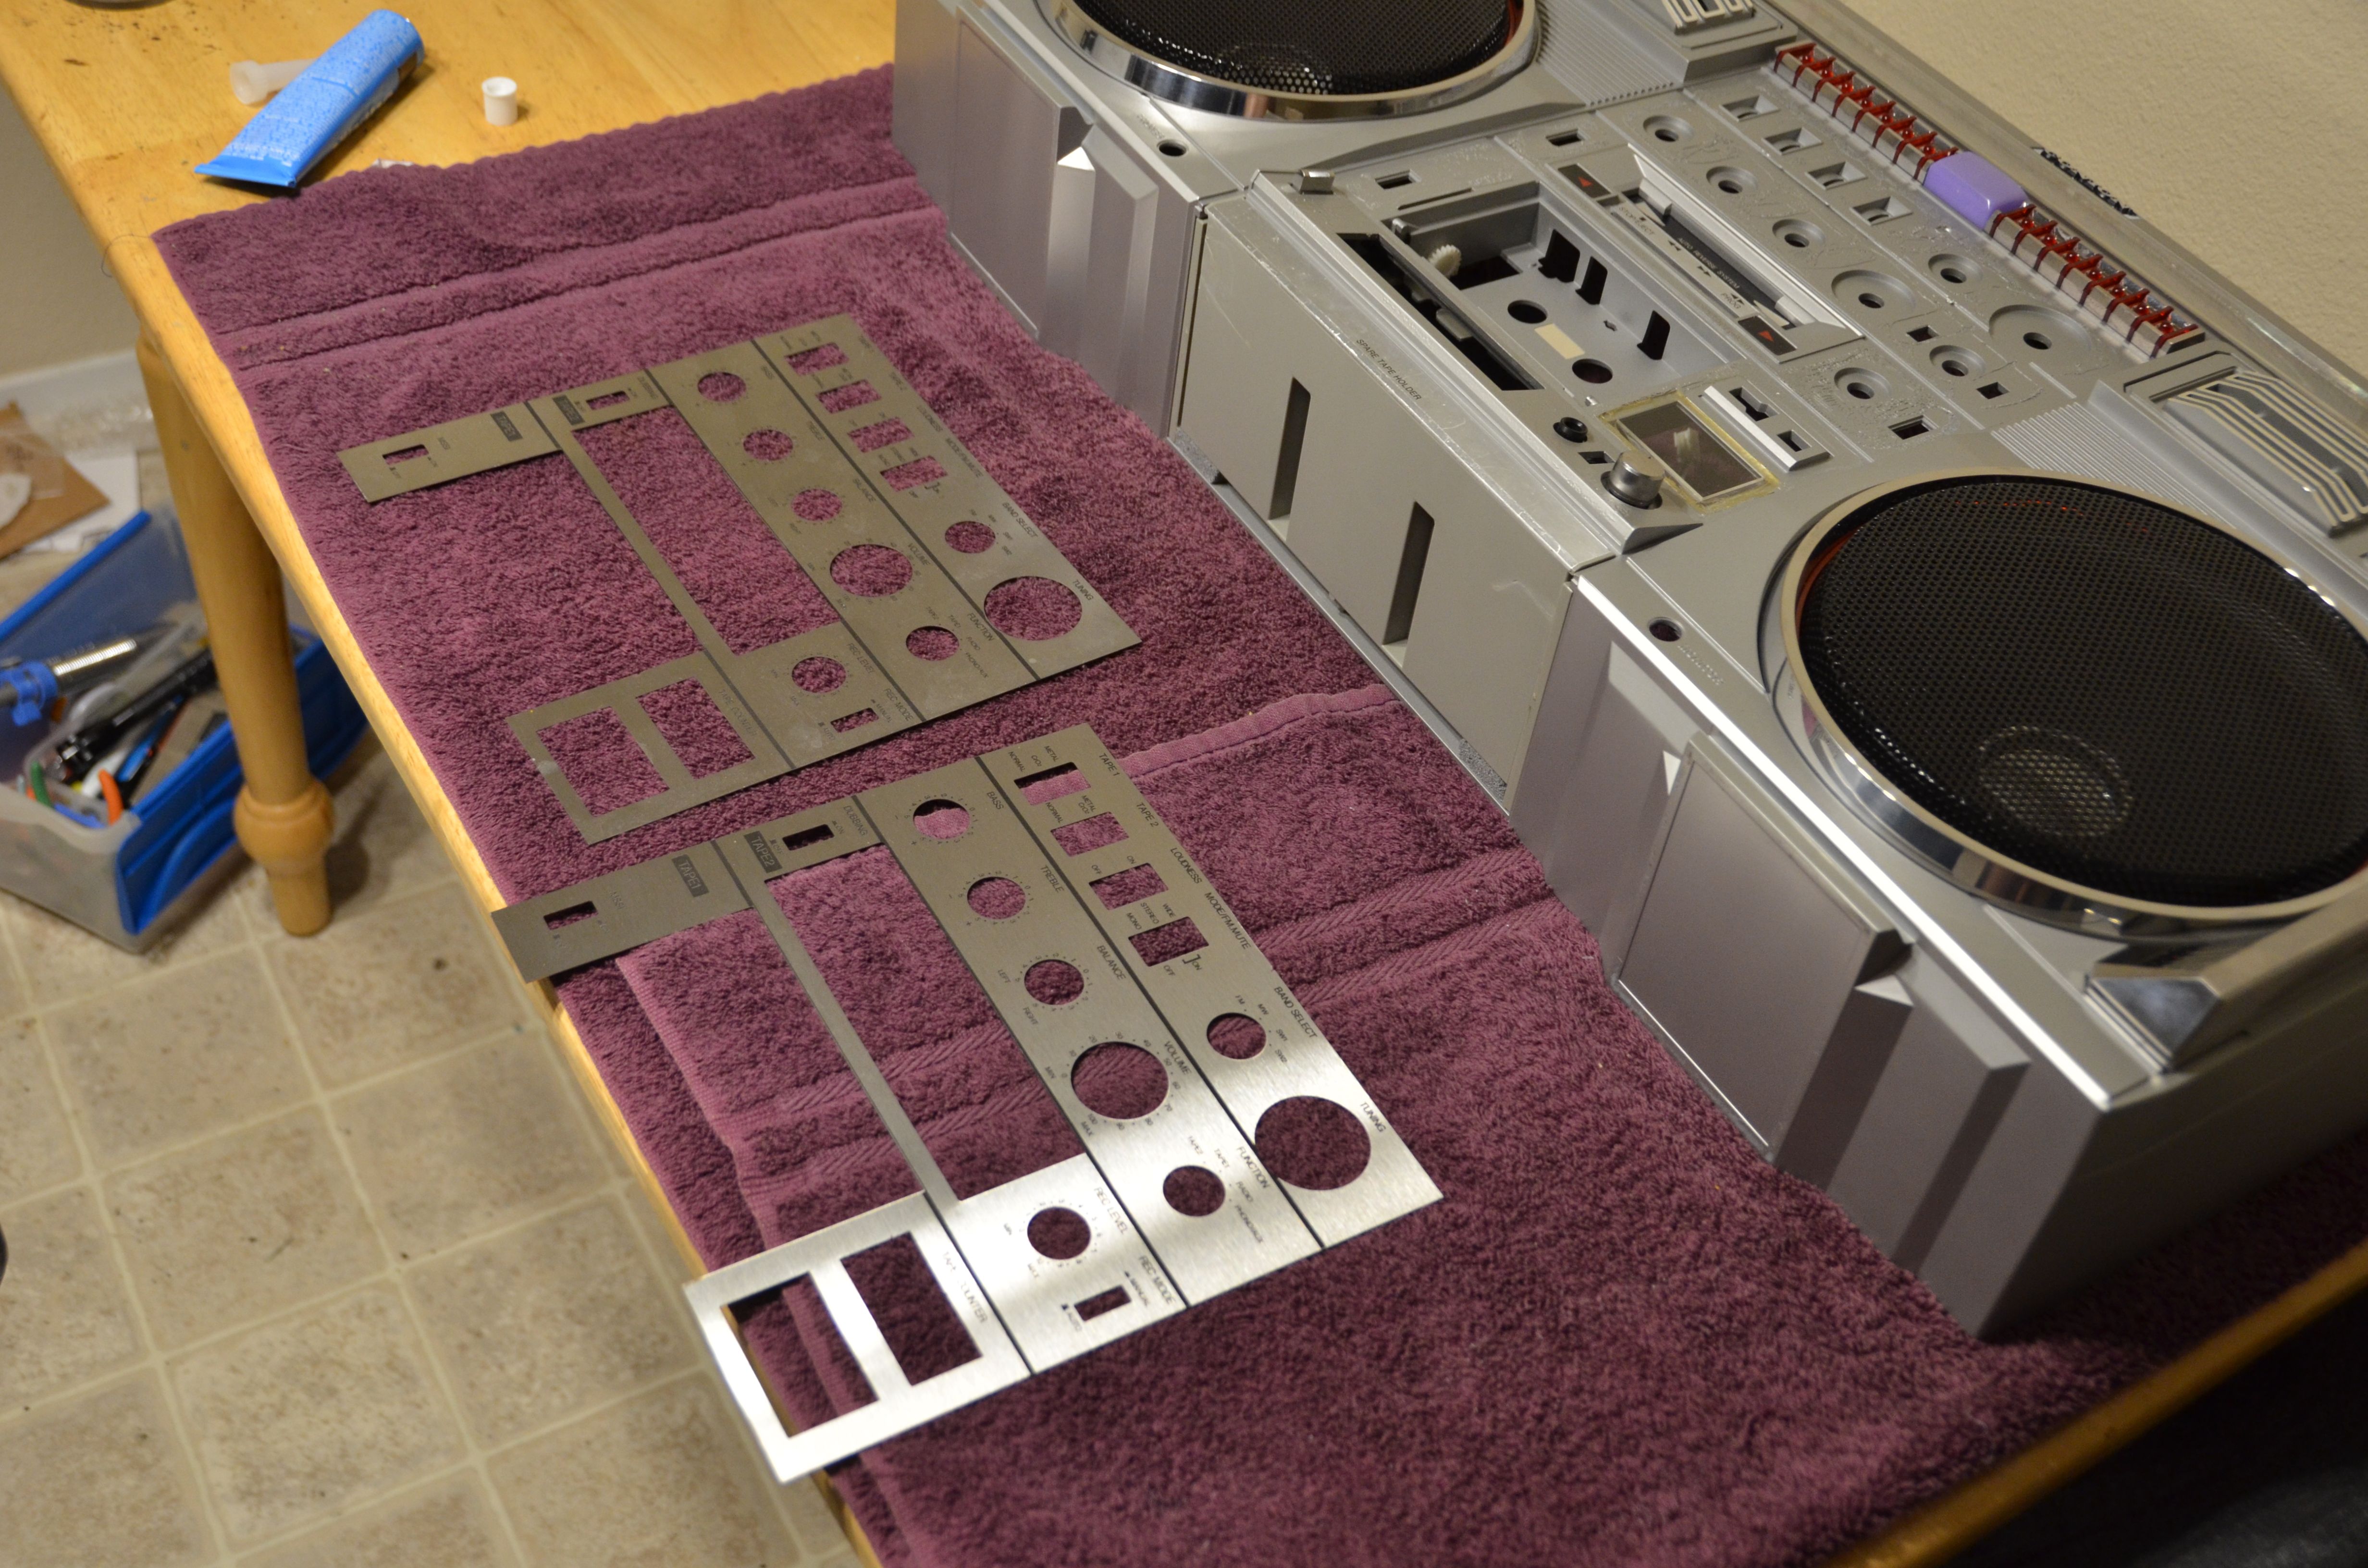
Got her back together and finally got around to attaching the new stainless trim and lower trim scavenged from another box. Earlier on I had thrown in the towel on restoring the chrome on the tweets/mids, but since I began this project I discovered the cutting machine, so today I applied some chrome stickers I designed. Besides a bit of buckling on some corners they look great (see video below)
https://www.youtube.com/watch?v=vP-0JA1fCoY
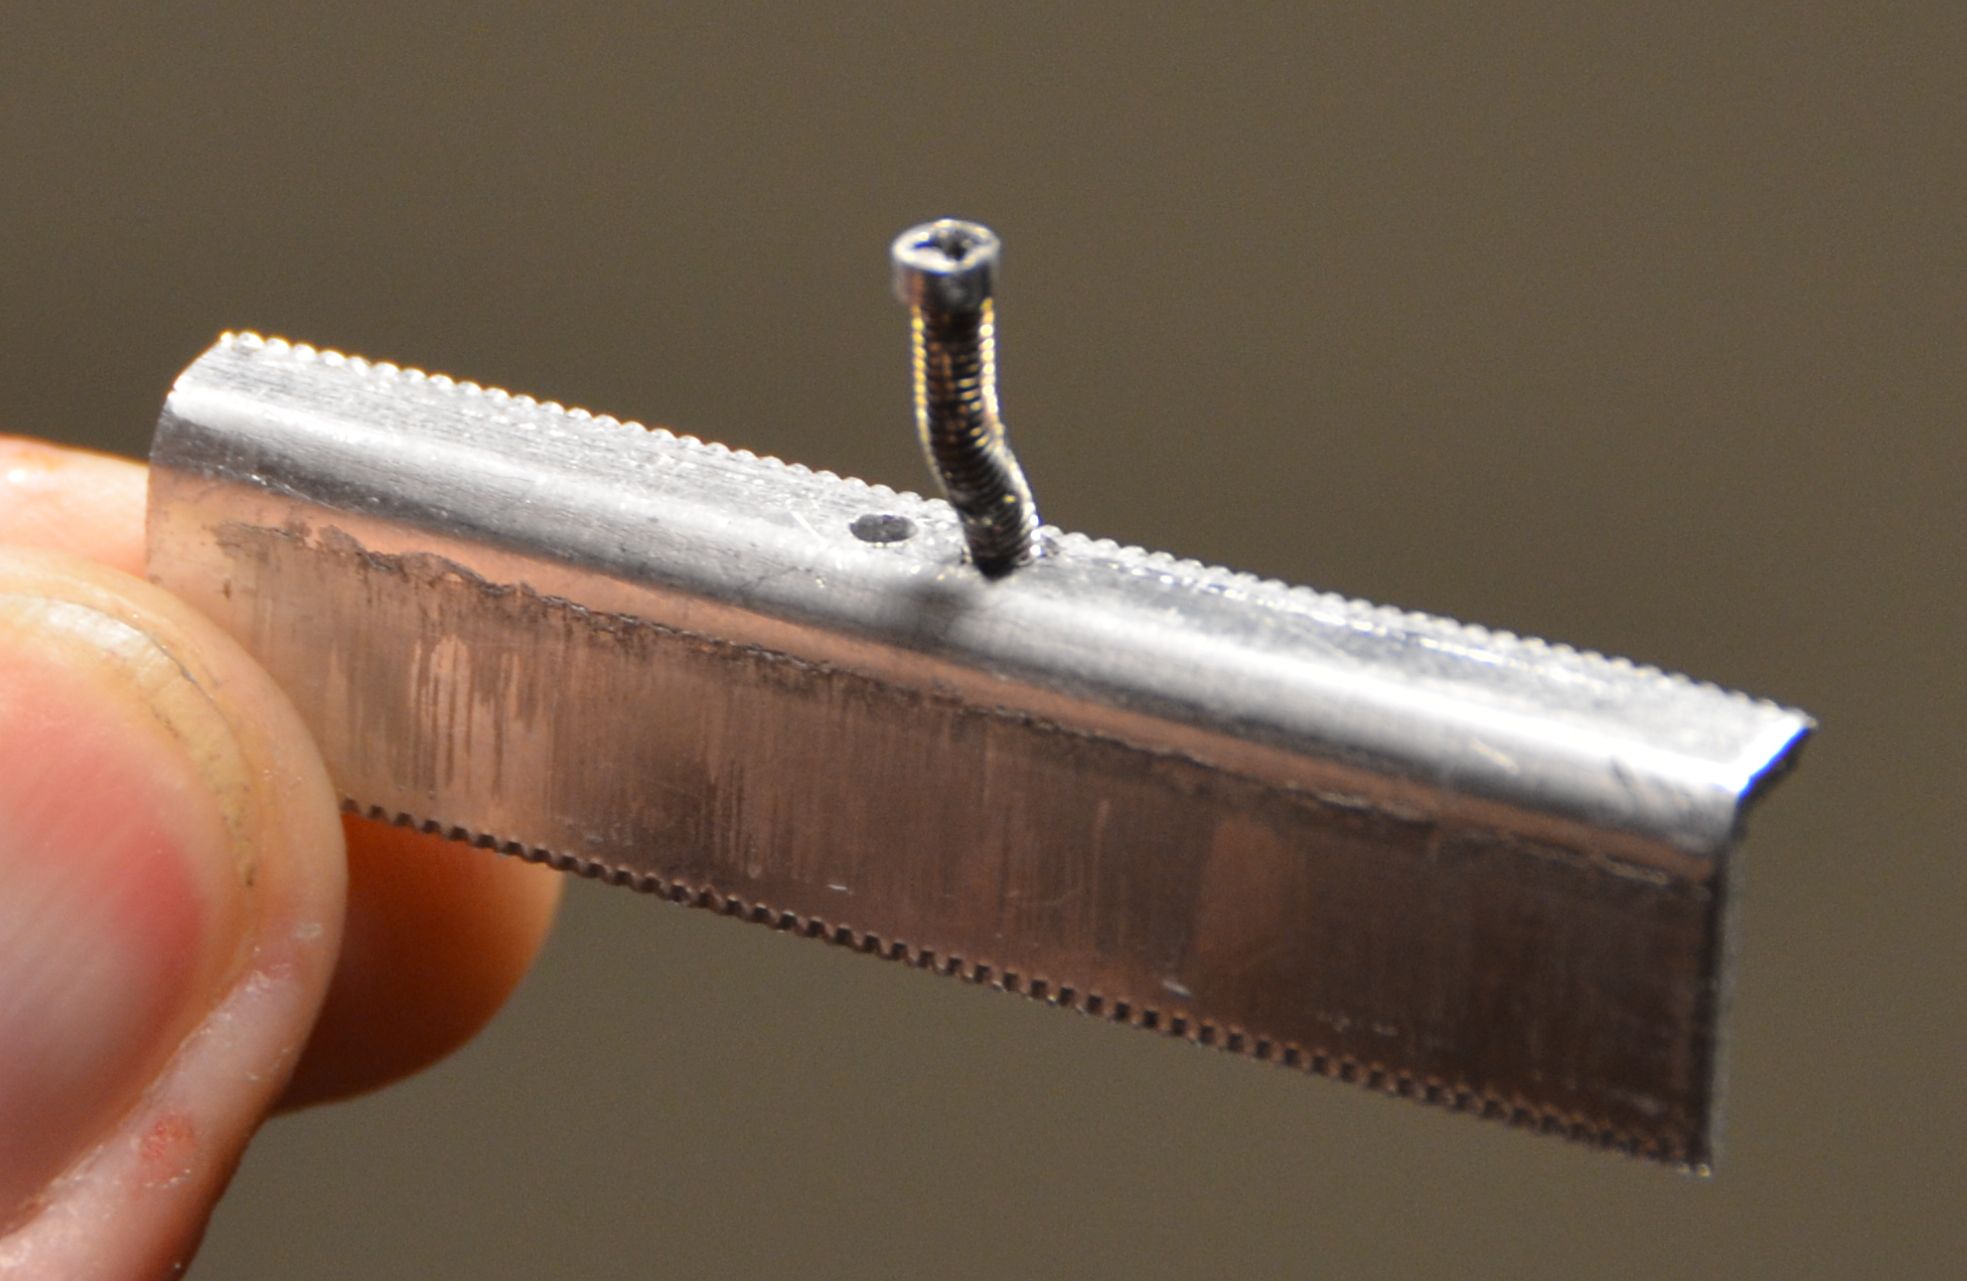
As I was just about to reattach the frame, the tray pin cracked loose, which was a very opportune time for that to happen since tray work can't happen with the frame in. The amount of plastic surrounding the screw I was using for a pin (see earlier in this thread) just wasn't enough to give it the support it needed. Half of the flange cracked away and seemed to be a simple plastic weld job, but then, as with all of us, it disappeared into another dimension. So, I decided this needed a new back, so I sanded it flat and designed a bracket out of a chunk of heatsink from an old VCR")
The first one I made didn't work because the metal was too thin, so I started over with a chunk of aluminum thick enough to keep the screw from wobbling. Once I got that done I realized how important it is not to move the position of the pin, or else the tray won't look flush when closed - it sticks out too far. So, since the pin had to be screwed into the plate, and the old location was halfway into the back of the tray, I had to create an offset on the pin itself. I got it lined up and it works like a champ. I glued that sucker on there and it's never coming off!
With the exception of possibly adding Bluetooth, redesigning the LEDs to run off a lower voltage to avoid dropouts, and if a miracle occurs and I find a way to make the lower trims, this project is finally done! I think it's only fair that I wrap it up with some words of thanks and a full list of what I did. I never intended this to take so long, but then again I never intended to fall in love with it and want to do all I could.
I spent a lot of time creating the lettering and other specs along the way, here are links to those threads:
Wiring diagram for chassis (Conion and Clairtone)
Schematic for LED VU meters
Mechanical drawing for main trim
Mechanical drawing for lower cassette deck door
Mechanical drawing for lower cassette deck keys
Mechanical drawing for tape tray trim
Mechanical drawing for antenna
In no particular order, here is a best-guess on the tasks completed:
Rear chassis de-yellowed with home-brew retrobrite session
Full re-cap with Nichicon Golds
Stripped and sanded both grills, pushed out dent on left one
Both amp chips replaced with new old stock and repasted
Reglued pause key for lower deck
Straightened trim on lower deck door
Welded tape tray cracks
Replaced both missing screws from aux jack bracket
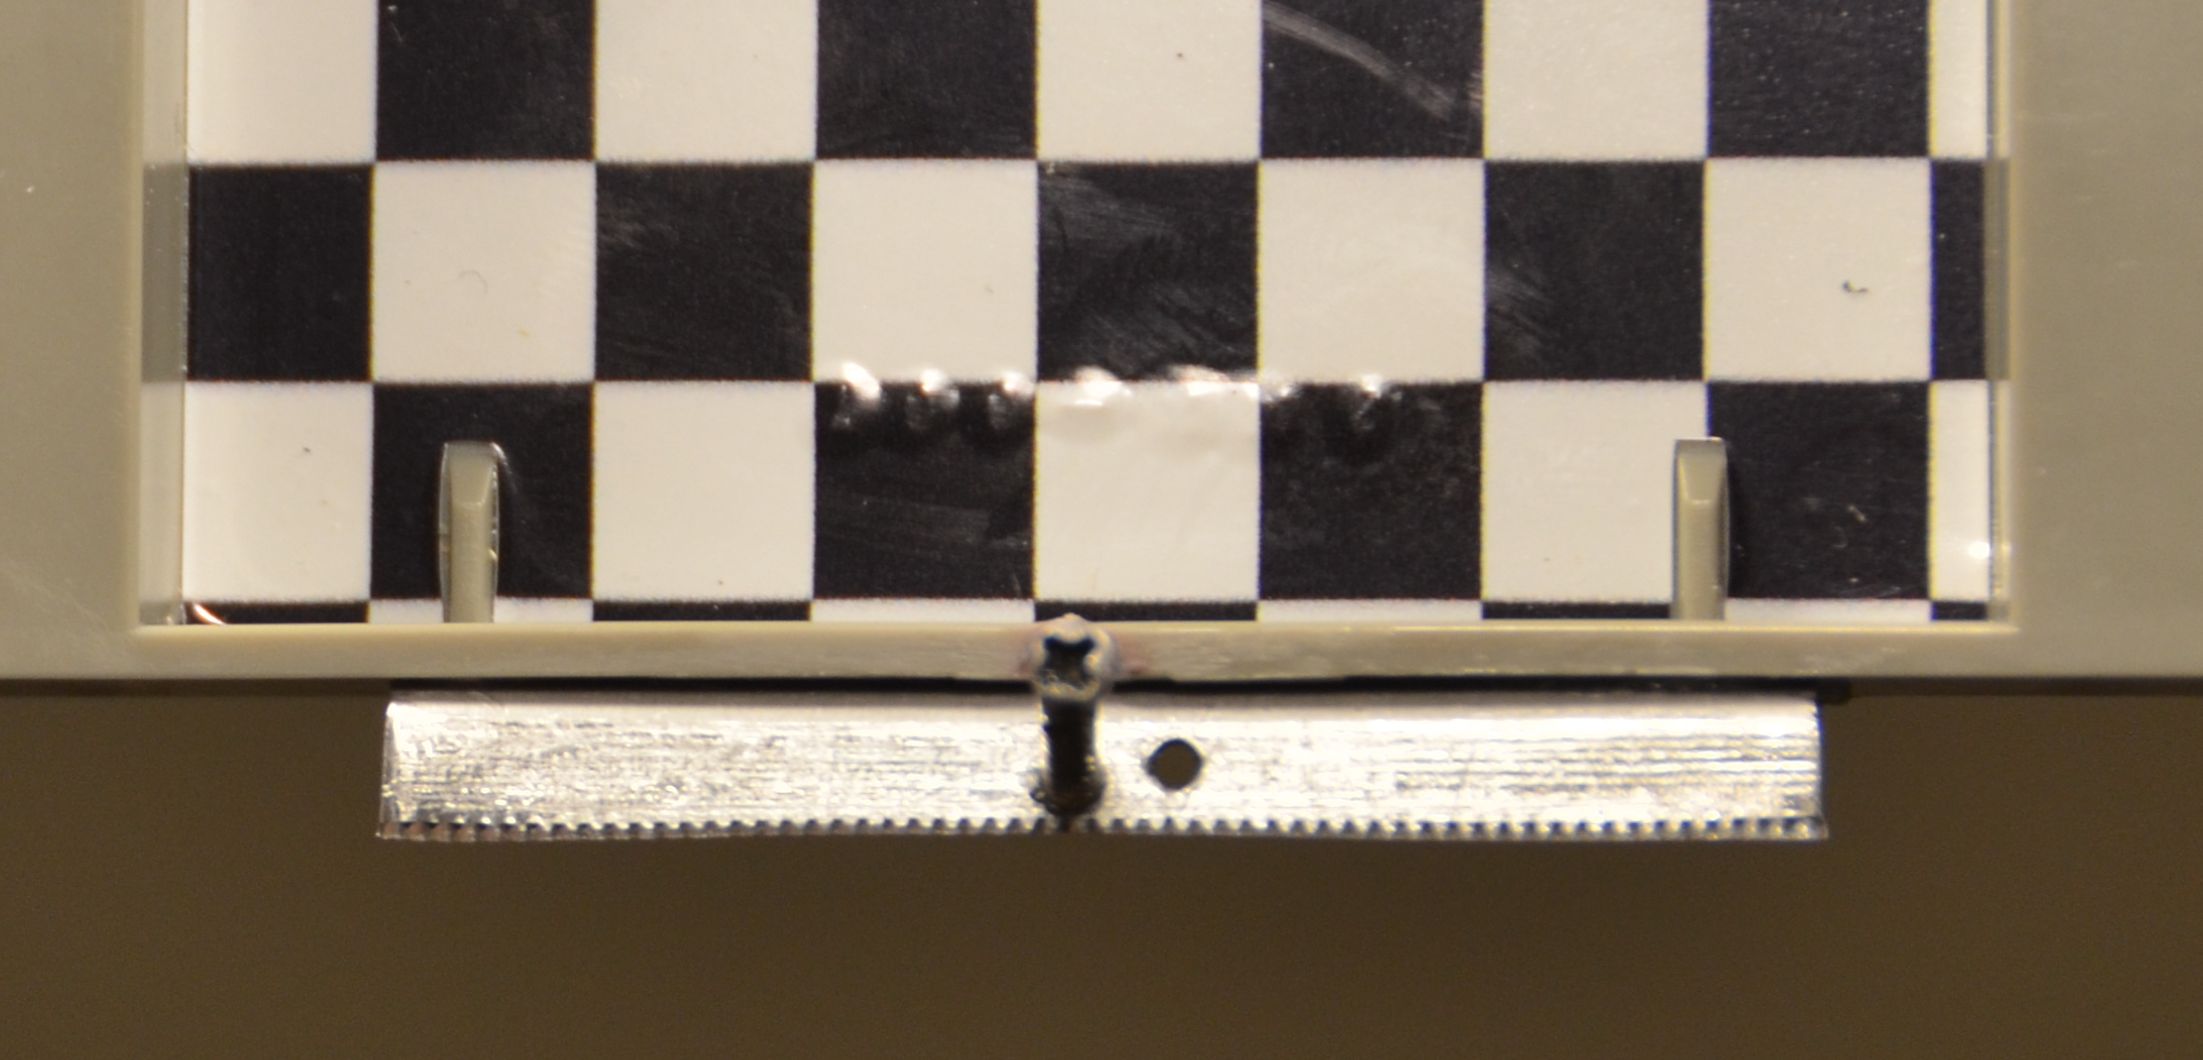
Reattached tape tray trim
All pots and switches on amp and control boards (except for tape type modes) disassembled and cleaned and Deoxited
Removed deep scratches from dial window, repolished with Micromesh pads. Reattached with rebuilt heat stakes and E6000 acrylic glue
Removed battery plate to overhaul the battery coils. Reattached with rebuilt heat stakes and E6000
Repaired numerous cracks along the rear cabinet edge, and reattached numerous screw posts and those tiny tabs around the edge.
Replaced missing screw on mixing board bracket
Used the cutter to make a replacement chrome sticker for the lower cassette deck bay (trashed during chassis repaint)
Scavenged an intact beat cancel switch from another C100F, mine was usable but black part was half-melted
Reattached the upper tape deck door
Resoldered cracked solder joints on the bass pot - actually I resoldered all the pots and switches afterwards
Attached a spring scavenged from a parts box for the lower deck door
Used a sharpie to blacken the woofers and mids
Hollowed out the old tweeters and dropped in Dayton neodymium tweeters
Installed new belts on both cassette decks
Designed a template for cutting out custom liners for the tape tray. Used a black-and-white checker pattern
Disassembled the lower deck to fix an issue with jammed record and play keys, which was resolved by moving a spring attachment point
Created new rubber feet for the rear cabinet
Acquired a replacement antenna from another box with an intact one
Reattached the chassis wires with E6000 glue
Rerouted the wiring as close to factory spec as possible, reapplying zip ties and anchor tabs
Replaced the bulb for the dial window with three white LEDs, and rewired it to system power instead of the transformer so it lights up on batteries too
Added LEDs above the VU meters
Remade all of the dampening strips along the seam with fabric
Disassembled the handle and applied SuperLube
Treated all chrome parts with Nevr-Dull
Restored the tape tray pin - twice
Total West Customs redid the chassis with silver bumper paint and the grills with gloss black enamel.
Thanks to Vintage Man for sending me at no charge the metal bracket I was missing between the amp board and the frame.
Thanks to blu_fuz for sending me the screws to the rear cabinet I was missing.
Thanks to Laser Cutting Services Inc. for the stainless steel trims
Thanks to Avery at drytransfer.com for the new trim lettering
Thanks for the existence of TAP Plastics, Harbor Freight, Home Depot, eBay and Amazon and most of all the others on this site for so much help I'd never get anywhere else.
With that, here's some pics of the work on the tape tray and trims.


https://www.youtube.com/watch?v=vP-0JA1fCoY
As I was just about to reattach the frame, the tray pin cracked loose, which was a very opportune time for that to happen since tray work can't happen with the frame in. The amount of plastic surrounding the screw I was using for a pin (see earlier in this thread) just wasn't enough to give it the support it needed. Half of the flange cracked away and seemed to be a simple plastic weld job, but then, as with all of us, it disappeared into another dimension. So, I decided this needed a new back, so I sanded it flat and designed a bracket out of a chunk of heatsink from an old VCR
The first one I made didn't work because the metal was too thin, so I started over with a chunk of aluminum thick enough to keep the screw from wobbling. Once I got that done I realized how important it is not to move the position of the pin, or else the tray won't look flush when closed - it sticks out too far. So, since the pin had to be screwed into the plate, and the old location was halfway into the back of the tray, I had to create an offset on the pin itself. I got it lined up and it works like a champ. I glued that sucker on there and it's never coming off!
With the exception of possibly adding Bluetooth, redesigning the LEDs to run off a lower voltage to avoid dropouts, and if a miracle occurs and I find a way to make the lower trims, this project is finally done! I think it's only fair that I wrap it up with some words of thanks and a full list of what I did. I never intended this to take so long, but then again I never intended to fall in love with it and want to do all I could.
I spent a lot of time creating the lettering and other specs along the way, here are links to those threads:
Wiring diagram for chassis (Conion and Clairtone)
Schematic for LED VU meters
Mechanical drawing for main trim
Mechanical drawing for lower cassette deck door
Mechanical drawing for lower cassette deck keys
Mechanical drawing for tape tray trim
Mechanical drawing for antenna
In no particular order, here is a best-guess on the tasks completed:
Rear chassis de-yellowed with home-brew retrobrite session
Full re-cap with Nichicon Golds
Stripped and sanded both grills, pushed out dent on left one
Both amp chips replaced with new old stock and repasted
Reglued pause key for lower deck
Straightened trim on lower deck door
Welded tape tray cracks
Replaced both missing screws from aux jack bracket
Reattached tape tray trim
All pots and switches on amp and control boards (except for tape type modes) disassembled and cleaned and Deoxited
Removed deep scratches from dial window, repolished with Micromesh pads. Reattached with rebuilt heat stakes and E6000 acrylic glue
Removed battery plate to overhaul the battery coils. Reattached with rebuilt heat stakes and E6000
Repaired numerous cracks along the rear cabinet edge, and reattached numerous screw posts and those tiny tabs around the edge.
Replaced missing screw on mixing board bracket
Used the cutter to make a replacement chrome sticker for the lower cassette deck bay (trashed during chassis repaint)
Scavenged an intact beat cancel switch from another C100F, mine was usable but black part was half-melted
Reattached the upper tape deck door
Resoldered cracked solder joints on the bass pot - actually I resoldered all the pots and switches afterwards
Attached a spring scavenged from a parts box for the lower deck door
Used a sharpie to blacken the woofers and mids
Hollowed out the old tweeters and dropped in Dayton neodymium tweeters
Installed new belts on both cassette decks
Designed a template for cutting out custom liners for the tape tray. Used a black-and-white checker pattern
Disassembled the lower deck to fix an issue with jammed record and play keys, which was resolved by moving a spring attachment point
Created new rubber feet for the rear cabinet
Acquired a replacement antenna from another box with an intact one
Reattached the chassis wires with E6000 glue
Rerouted the wiring as close to factory spec as possible, reapplying zip ties and anchor tabs
Replaced the bulb for the dial window with three white LEDs, and rewired it to system power instead of the transformer so it lights up on batteries too
Added LEDs above the VU meters
Remade all of the dampening strips along the seam with fabric
Disassembled the handle and applied SuperLube
Treated all chrome parts with Nevr-Dull
Restored the tape tray pin - twice
Total West Customs redid the chassis with silver bumper paint and the grills with gloss black enamel.
Thanks to Vintage Man for sending me at no charge the metal bracket I was missing between the amp board and the frame.
Thanks to blu_fuz for sending me the screws to the rear cabinet I was missing.
Thanks to Laser Cutting Services Inc. for the stainless steel trims
Thanks to Avery at drytransfer.com for the new trim lettering
Thanks for the existence of TAP Plastics, Harbor Freight, Home Depot, eBay and Amazon and most of all the others on this site for so much help I'd never get anywhere else.
With that, here's some pics of the work on the tape tray and trims.
JustCruisin
Member (SA)
SLO
Member (SA)
I agree! Theres no end to the madness!JustCruisin said:Those tweeter bezels look great! And that beat!!
jimmyjimmy19702010
Member (SA)
Looks great!!
On your video, I noticed the led tape display looks like it's running fast (like its FFWDing). I always thought the LED display ran slower when in play mode!?
Well done on a fantastic looking beast of a box!!
James....
On your video, I noticed the led tape display looks like it's running fast (like its FFWDing). I always thought the LED display ran slower when in play mode!?
Well done on a fantastic looking beast of a box!!
James....
jimmyjimmy19702010
Member (SA)
Ok, right. Fair enough!caution said:Oh! That's because it's an mp3 cassette with freely spinning gears
I've never seen how one of those MP3 things works - obviously it sounds great!!
James...
Cpl-Chronic
Member (SA)
Holy FARK BATMAN!!! That is 1 solid bad-ass resto...no cut corners....no stone un-turned....
Skiiiiillss SON!!! Skiiiillls!!!
Skiiiiillss SON!!! Skiiiillls!!!

hemiguy2006
Member (SA)
Wow !!
I Just got done going through this entire thread,
AMAZING!!!!
Fantastic work and a labor of love for sure.
You really took your time and turned that box into a gem!
I wish I had the time / Patience for that level of restoration now a days.
I Restored my C-100 about 7 or 8 Years back and spent a ton of time on it getting it finished.
It was damaged in shipment and was a real mess.
I can really appreciate all the time you spent on getting that box where it is now, you really left no stone unturned in your restoration.
You will always have a special bond with that box, knowing what it was
and what you made it to be.
The one pic of all the parts laid out reminded me of one I posted in my resto thread.
Hats off to you my friend you did a fantastic job!!!